Monday, September 30, 2013

Hooray It's Your Birthday

Hello, Friends.  It's the last day of September and I can't believe how fast this year has flown by!  I have multiple family and friends who have birthdays coming up in October, November, December and January.  It birthday season at my house.  Here is a masculine birthday card I made for a friend.

Cricut Cartridge:  Yummy Imagine
Designer Paper:  American Crafts
Sentiment:  Scrappy Mom's "Hooray for Birthdays" stamp set
Other:  Tim Holtz Tea Dye Distress Ink

A2 sized card = 5.5" x 4.25"
Yummy Imagine Cartridge
 Card Recipe:
  • Mat 1 (tan) = 5 3/8" x 4 1/8"
  • Mat 2 (checkered) = 5 1/4" x 4"
  • Mat 3 (green pattern border) = 2 1/2" x 5"
  • Mat 4 (tan) = 2 7/8" x 4 1/8"
  • Mat 5 (white) = 2 3/4" x 4"
  • Sentiment "Hooray . .  It's your Birthday!" = from Scrappy Mom's "Hooray for Birthdays" stamp set.
 
  • Birthday Cake = cut three at 3 1/4" from Yummy Cartridge (two are glued together).  Top two attached with foam tape.  Strawberries are accented with glitter glue.

Inside of Card
Inside of Card:
  • Mat 1 (tan) = 5" x 3.75"
  • Mat 2 (beige) = 4.75" x 3.5"

Tuesday, September 24, 2013

Haunted House Scene

Hello, friends.  I've been trying to create a post for an upcoming challenge for Halloween.  Ugg - I'm brain locked.  Here is one of the cards that didn't make the cut for me:
 
 I created a Haunted House Scene with Flying Bats.
  •  
  • Designer Paper = K and Company "Halloween Mat" 4.75" x 6" pad.
  • Cricut cartridge = Create a Critter 2.
  • Sentiment = Handwritten
  • Punches = Martha Stewart (fence)

A2 sized card = 5.5" x 4.25"
Cricut Create a Critter 2
Card Recipe:
  • Mat 1 (lime green) = 5 3/8" x 4 1/8".
  • Mat 2 (dark gray) = 5 1/4" x 4".
  • Fence = from Martha Stewart punch.  Mat was 1" x 4" before punching.

  • Haunted House = cut at 3 3/4" from Cricut Create a Critter 2 cartridge; [PirtGost][Accessory] found on page 55 of the folder.  Haunted House is mounted with foam tape.
  • Bats = cut 1 bat at 1/2".  Cut 2nd bat with shadow at 1" from Cricut Create a Critter 2 cartridge; [VampBee][Icon] found on page 59 of the folder.  White gel pen used for faux stitching.
  • Mat under sentiment = cut at 1/2" from Cricut Create a Critter 2 cartridge; [VampBee][Phrase] found on page 59 of the folder.  Sentiment "Beware! is handwritten.

Inside of Card
Inside of Card:
  • Mat 1 (lime green) = 5" x 3.75".
  • Mat 2 (black) = 4.75" x 3.5".
  • Mat 3 (white) = 4.5" x 3.25".
  • Bat = cut at 1/2 from Cricut Create a Critter 2 cartridge; [VampBee][Icon] found on page 59 of the folder.

Saturday, September 21, 2013

SBC - Circle Easel Card

The current Scrapbook Blessings Club's challenge is to create a Circle Easel Card using the directions found from YouTube tutorial from Dawn Olchefske. 

Inspiration:  Dawn Olchefske Circel Easel Card
Cricut Cartridges:  Mini Monograms and Simply Charmed
Designer Paper:  American Crafts 6" x 6" pad
Punch:  Maury leaf punch
Stamps:  Peachy Keen "PK-490 Everyday Character Face Assortment" and CardzTV "Heartfelt Wishes" stamp sets.
Accent:  gem from Michaels; white gel pen, chalk
Other:  foam tape

Card Recipe:
  • Card Base:  Using the Cricut Craft Room (CCR) or a Gypsy, weld two scallop circles together.  My scallops are from the Cricut Mini Monograms cartridge; sized at 4.75" [crclsclp][shadow] found on page 129 of the folder.   Tip:  When welding two images together, make sure you "flip" the second image vertically before welding. 
  • Mat 1 (brown) = cut at 4.75" using the CCR from Cricut Mini Monograms cartridge; [crclsclp] found on page 129 of the folder.
  • Mat 2 (large polka dot pattern) = cut at 4.6" using the CCR from Cricut Mini Monograms cartridge; [crclsclp] found on page 129 of the folder.
  • Mat 3 (brown inside of card) = cut at 4.25" from Cricut Mini Monograms cartridge; [crclsclp] found on page 129 of the folder.
  • Mat 4 (checked pattern inside of card) = cut at 4" from Cricut Mini Monograms cartridge; [crclsclp] found on page 129 of the folder.

  • Lady Scarecrow = cut image and shadow at 3.75" from Cricut Simply Charmed cartridge; [Scarecw2] found on page 57 of the folder.  Tip:  Multiple images of your base cut glued together will give you a "chipboard" effect.  Scarecrow is attached with foam tape. 
  • Scarecrow Accents = face is from Peach Keen Stamps "PK-490 Everyday Character Face Assortment."  Eyes have been colored in using a white gel pen.  Cheeks were colored using chalk.  Flower is accented with gem from Michaels.  Faux stitching on scarecrow made with white gel pen.
  • Leaves = created using Maury leaf punch.

  • Sentiment Mat = cut to size of sentiment (hand cut).  Sentiment mat created using multiple layers and mat colors.  Mat is attached with foam tape.  The elevated sentiment becomes the card stop.
  • Sentiment = from CardzTV "Heartfeld Wishes" stamp set.
I hope you enjoyed my card.  As always, comments are welcomed and appreciated!

~ Marilyn

Monday, September 16, 2013

Cards in Envy - A Little Bit Retro

Today at Cards in Envy, we're creating cards that are "A Little Bit Retro." 

  • Create a card with a style, fashion or design from the past. This not to be confused with vintage but rather retro. Usually from the 50s, 60, 70s and even 80s.  
Searching through my Cricut cartridges, I came upon this cute little toaster that looks like it came right out of a kitchen from the 60's.

Cartridge:  Cricut Imagine Kate's Kitchen.
Designer Paper:  paper colors are from Cricut Imagine Kate's Kitchen.
Sentiment:  CardzTV "Heartfelt Wishes" stamp set.
Other:  Tim Holtz Tea Dye Distress Ink.

A2 sized card = 5.5" x 4.25"
Cricut Imagine Kate's Kitchen
Card Recipe:
  • Mat 1 (blue) - 5 3/8" x 4 1/8".
  • Mat 2 (yellow flower pattern) = 5 1/4" x 4".
  • Mat 3 (blue) = 4 1/2" x 3 3/8".
  • Mat 4 (brown) = 4 3/8" x 3 1/8".
  • Mat 5 (red pattern) = 4 1/4" x 3".
  • Mat 6 (blue under sentiment) = hand cut to size of sentiment.
  • Mat 7 (beige under sentiment) = hand cut to size of sentiment.

  • Toaster and Toast = cut at 3" from Cricut Imagine Kate's Kitchen.  I cut an additional toaster (using the layer option) and attached both using foam tape.
  • Sentiment "Sending happy thoughts" = from CardzTV "Heartfelt Wishes" stamp set.

Inside of Card
Inside of Card:
  • Mat 1 (blue) = 5" x 3.75".
  • Mat 2 (red pattern) = 4.75" x 3.5".
  • Mat 3 (beige) = 4.5" x 3.25".
  • Toast = cut at 3" (relative size) from Cricut Imagine Kate's Kitchen.


Saturday, September 14, 2013

Slime Monster

I really don't care much for Halloween, but I do like playing with the Cricut Mini Monster's cartridge.

Cricut Cartridge:  Mini Monsters
Embossing:  Cuttlebug "Geometric Rings" folder; Cuttlebug "Swiss Dots" folder.
Designer Paper: K&Company "Halloween Mat" 4.75" x 6.75" pad.
Other:  Tim Holtz Tea Dye Distress Ink.

A2 sized card = 5.5" x 4.25"
Cricut Mini Monsters cartridge
Card Recipe:
  • Mat 1 (gray) = 5 3/8" x 4 1/8".
  • Mat 2 (gray pattern) = 5 1/4" x 4".  Mat embossed with Cuttlebug "Geometric Rings" folder.
  • Mat 3 (lavender) = 1 3/4" x 4".
  • Mat 4 (purple pattern) = 1 1/2" x 4".

  • Mat 5 (lavender) = 3 1/8" x 4 1/8".
  • Mat 6 (purple) = 3" x 4".  Mat embossed with Cuttlebug "Swiss Dots" folder.
  • Monster = cut image and shadow at 2" from Cricut Mini Monsters cartridge; [Beware] found on page 45 of the folder.  Head portion mounted with foam tape.

Inside of Card
  • Inside of Card:
  • Mat 1 (purple) = 5" x 3.75".
  • Mat 2 (white) = 4.75" x 3.5".
  • Bat = stamped image from Craftsmart.

Sunday, September 8, 2013

Warm Holiday Wishes

Here's a super easy and quick card most anyone can make.

Inspiration:  Dawn Olchefske YouTube
Sentiments:  Inkadinkado "Holiday Wishes" stamp set.
Punch:  The Paper Studio
Twine:  Baker's Twine from Darice
Accents:  Stickles.  Gem from Michaels

A2 sized card - 5.5" x 4.25"
Card Recipe:
  • Mat 1 (black) = 5.25" x 4".
  • Mat 2 (beige) = 5" x 3.75".
  • Background:  cover the top of your stamp block with Tim Holtz Antique Linen Distress Ink and stamp onto the center of your card stock.
  • Sentiment and Swirl = from Inkadinkao "Holiday Wishes" stamp set.  Memento Tuxedo Black Ink.
  • Twine = Baker's Twine from Darice
  • Snowflake = punch from The Paper Studio
  • Accent:  gem in center of snowflake from Michaels.

Inside of Card
Inside of Card:
  • Mat 1 (black) = 5" x 3.75".
  • Mat 2 (beige) = 4.75" x 3.5"
  • Snowflake Stamp = stamp several from Inkadinkao "Holiday Wishes" stamp set.  Memento Tuxedo Black Ink.
  • Accent = Stickles added to and around snowflake stamped images.

Wedding Bells

The wedding card was created using the Cricut Sweethearts cartridge.

Cricut Cartridge:  Sweethearts
Embossing:  Indentz "Vine 1", Cuttlebug "Swiss Dots" folders.
Designer Paper: Recollections
Ribbon:  from Michaels
Other:  Stickles
Sketch:  OWH Sketch #38

A2 sized card = 5.5" x 4.25"
Cricut Sweethearts cartridge
Card Recipe:
  • Mat 1 (black) = 5 3/8" x 4 1/8"
  • Mat 2 (black floral design) = 5 1/4" x 4"
  • Mat 3 (black striped border) =  cut two at 1" x 3 3/4"
  • Mat 4 (black striped border in center) = 1 1/2" x 3 3/4"
  • Mat 5 (black under image) = 4 1/4" x 3 1/4"
  • Mat 6 (white under image) = 4" x 3".  Mat embossed using Indentz "Vine 1" folder.
  • Ribbon = from Michaels.  Bow created using Bow Easy.

  • Wedding Bells = cut image and shadow at 2 1/2" from Cricut Sweethearts cartridge; [Bells] found on page 56 of the folder.  Bells were embossed with Cuttlebug "Swiss Dots" folder.  Stickles used for bell dong-er and tie cuts.

Inside of Card:
  • Mat 1 (black) = 5 1/8" x 3 7/8"
  • Mat 2 (black stripped) = 5" x 3 3/4"
  • Mat 3 (beige) = 4 3/4" x 3 1/2"
  • Tie = cut image at 1 1/2" from Cricut Sweethearts cartridge; [Bells] found on page 56 of the folder.
  • Sentiment (not seen in photo) "Happy Wedding" = source unknown, but I believe it was made by Inkadinkado.

Saturday, September 7, 2013

September 2013 Cricut Cart Hop

Welcome to the
September Cricut Cart Hop.
 
We are so happy you could join us.  You should have come from Cindy.  If you happened by my blog or are joining me from your dashboard, head over to Luisa's blog to start at the beginning.  We don't want you to miss any of the fun!

The design team each selected different Cricut cartridges that they would like to showcase for you today.  This is a one day blog hop, and we appreciate you leaving a comment letting us know what you think and telling us what is your most favorite cartridge to create with. 

The cartridges I used for the hop are: 
  • Kate's Kitchen Imagine
  • Live Simply Lite
  • Mustaches and Glasses
  • Pretty Pennants
  • Simply Sweet
  • Storybook 
Following are my four projects with links to give you more images and directions for creation.

1.  A Tisket a Tasket
  • Cartridge:  Cricut Storybook
  • Flowers and Butterflies:  Martha Stewart punches
  • Accent:  Stickles
A Tisket A Tasket
Cricut Storybook cartridge
 
 
2.  Eye Chart Card (with a hidden message):
  • Cartridges:  Simply Sweet and Mustaches and Glasses.
  • Designer Paper: Recollections.
  • Embossing:  Cuttlebug "Script" folder.
Eye Chart Card
Cricut Simply Sweet cartridge
Mustaches and Glasses Cricut Craft Room Exclusive

3.  Chef - Enjoy the Simple Pleasures:
  • Cartridges:  Cricut Imagine Kate's Kitchen and Cricut Pretty Pennants
  • Designer Paper:  from Cricut Imagine Kate's Kitchen
  • Sentiment:  My Favorite Things "Flopsey Goes Camping" stamp set.
Chef - Enjoy the Simple Pleasures
Kate's Kitchen Imagine cartridge
Cricut Pretty Pennants


4.  Mushroom Love:
  • Cartridges:  Cricut Live Simply Lite and Pretty Pennants.
  • Designer paper:  My Mind's Eye "Up and Away" 6" x 6" pack.
  • Punch:  from Martha Stewart
  • Sentiment:  My Favorite Things "Clearly Sentimental About Gardens."
  • Accent:  Liquid Pearls.  Gem from Michaels.
  • Other:  Tim Holtz Tea Dye Distress Ink.
Mushroom Love
Cricut Live Simply Lite
Cricut Pretty Pennants
Thanks for stopping by for this month's hop.  We hope that you enjoyed hopping along with us as much as we enjoyed putting our projects together for you.  Next up is Kathy . . . until next month! 

Here is the full line up:

1- Luisa - http://lepaperstudio.blogspot.com
2- Sandy- http://scrapbookblessings.blogspot.com
3- Cindy - http://inlovewithpaper.blogspot.com
4 -Marilyn - http://marilyncricutcards.blogspot.com/ 
5- Kathy U - http://kathy213-kathyscorner.blogspot.com/
6- Vivi J- http://vivijdesigns.blogspot.com/2013/08/september-100-cricut-blog-hop.html


Friday, September 6, 2013

Eye Chart

I go to the eye doctor a lot... so, how about an eye chart with a hidden message.

Cartridges:  Simply Sweet and Mustaches and Glasses.
Designer Paper: Recollections.
Embossing:  Cuttlebug "Script" folder.

A2 sized card = 5.5" x 4.25"
Cricut Simply Sweet
Cricut Mustaches and Glasses
Card Recipe:
  • Mat 1 (black pattern) = 5 3/8" x 4 1/8".
  • Mat 2 (white) = 5 1/4" x 4".  Mat embossed with Cuttlebug "Script" folder.
  • Eyeglasses = cut at 1" from Cricut Craftroom Exclusives Mustaches and Glasses.  I cut image 3 times to make a chipboard effect.

  • Letters "I" "L" "O" = cut at 1" from Cricut Simply Sweet cartridge.
  • Letters "V" "E" "Y" = cut at 3/4" from Cricut Simply Sweet cartridge.
  • Letters "O" "U" "S" "O" = cut at 1/2" from Cricut Simply Sweet cartridge.

Inside of Card

Inside of Card:
  • Mat 1 (black pattern) = 5" x 3.75".
  • Mat 2 (white) = 4.75" x 3.5".

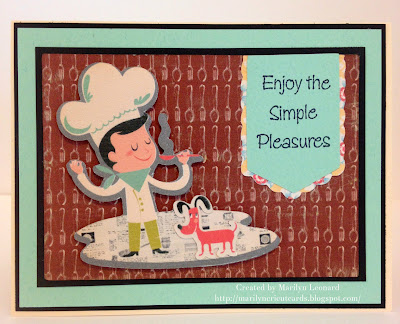
Enjoy the Simple Pleasures

The chef is cooking up something good.  Looks like the little dog is interested anyway.

Cartridges:  Cricut Imagine Kate's Kitchen and Cricut Pretty Pennants
Designer Paper:  from Cricut Imagine Kate's Kitchen
Sentiment:  My Favorite Things "Flopsey Goes Camping" stamp set.

A2 sized card = 5.5" x 4.25"
Cricut Imagine Kate's Kitchen
Cricut Pretty Pennants
 
Card Recipe:

  • Mat 1 (black) = 5 3/8" x 4 1/8".
  • Mat 2 (aqua) = 5 1/4" x 4".
  • Mat 3 (black) = 3 3/8" x 4 5/8".
  • Mat 4 (brown pattern) = 3 1/4" x 4 1/2."
 
  • Chef and Dog = cut at 3" from Cricut Imagine Kate's Kitchen.  I cut the dog twice to give him some depth (using the layer feature).  Image is mounted with foam tape.
  • Pennant = cut image and shadow at 2" from Cricut Pretty Pennants cartridge; [Banner2] and [BnrSclp2].
  • Sentiment "Enjoy the Simple Pleasures" = from My Favorite Things "Flopsey Goes Camping" stamp set.

Inside of Card:
  • Mat 1 (black) = 5" x 3.75".
  • Mat 2 (aqua) = 4.75" x 3.5".
  • Mat 3 (beige) = 4.5" x 3.25".
  • Chef's Hat = cut at 3" (relative size) from Cricut Imagine Kate's Kitchen (using layer feature).

A Tisket A Tasket

This nursery rhyme came to mine while doing this project.  
  •  A Tisket a Tasket, a green and yellow basket.  I wrote a letter to my love, and on the way I dropped it.  
I'm giving my future DIL this bicycle for her birthday.  Of course, I had to decorate the basket first!

Cartridge:  Cricut Storybook
Flowers and Butterflies:  Martha Stewart punches
Accent:  Stickles

  • Letter "J" = cut at 4.5" from Cricut Storybook cartridge.  Letter accented with Stickles and attached with foam tape.
  • Flowers and Butterflies = from Martha Stewart punches.
  • Inside the Basket = just some tissue paper to fluff it up.

Mushroom Love

I have a new set of stamps that I won.  They contain all sorts of gardening phrases.  Here's the mushroom from Cricut Live Simply Lite cartridge with one of the stamps from that set.

Cartridges:  Cricut Live Simply Lite and Pretty Pennants.
Designer paper:  My Mind's Eye "Up and Away" 6" x 6" pack.
Punch:  from Martha Stewart
Sentiment:  My Favorite Things "Clearly Sentimental About Gardens."
Accent:  Liquid Pearls.  Gem from Michaels.
Other:  Tim Holtz Tea Dye Distress Ink.


A2 sized card = 5.5" x 4.25"
Cricut Live Simply Lite cartridge
Cricut Pretty Pennants cartridge
Card Recipe:
  • Mat 1 (brown shimmer) = 5 3/8" x 4 1/8".
  • Mat 2 (stripped border) = 1" x 4 1/8".
  • Pennant:  Cut at 2.75" (using fit to width feature) from Cricut Pretty Pennants cartridge; [BnrSclp2].  Banner hand trimmed length-wise to fit sentiment.  Edges inked with Tim Holtz Tea Dye Distress Ink.
  • Sentiment "You can bury a lot of troubles digging in the dirt": from My Favorite Things "Clearly Sentimental About Gardens" stamp set.

  • Mushroom:  cut at 3" from Cricut Live Simply Lite cartridge: [Mushroom].  Image edges inked with Tim Holtz Tea Dye Distress Ink.  Liquid Pearls added to flower centers.  Mushroom attached with foam tape.
  • Bow on Mushroom:  from Martha Stewart punch.  Gem in center of bow from Michaels.

Inside of Card
Inside of Card:
  • Mat 1 (brown shimmer) = 5" x 3.75".
  • Mat 2 (beige) = 4.75" x 3.5".

Monday, September 2, 2013

OWH VCMP - No Greater Love

The tenth and final challenge is to create a card using the negative of the die cut.

Cricut Cartridges:  Elegant Edges, New Testament, Paper Doll Dress Up.
Designer Paper:  DCWV "The Old World Stack" 12" x 12" pack.
Sentiment:  CardzTV "Greater Love" stamp set.

A2 sized card = 5.5" x 4.25"
Cricut Elegant Edges
Cricut New Testament
Cricut Paper Doll Dress Up
Card Recipe:
  • Mat 1 (black) = 5 3/8" x 4 1/8".
  • Mat 2 (blue pattern) = 5 1/4" x 4".
  • Mat 3 (beige cardstock under the blue pattern) = 5 1/4" x 4".  This is for the negative cut on the crosses.
  • Mat Under Sentiment = cut with Gypsy or Cricut Craft room = cut at 1 1/2" height x 2 1/4" wide from Cricut Elegant Edges cartridge; [Dots1].
  • Sheep = cut at 1 1/2" from Cricut Paper Doll Dress Up [ntvty2]; hiding all the contour lines.  I cut 3 images to create a chipboard effect.
  • Sentiment = from CardzTV "Greater Love" stamp set.

  • Three Crosses on a Hill = cut at 2.5" from Cricut New Testament cartridge; [Sermon].  Using the CCR, I cut the crosses out of my blue mat making the negative of the image.

Inside of Card
Inside of Card:
  • Mat 1 (black) = 5" x 3.75"
  • Mat 2 (beige) = 4.75" x 3.5".
  • Three Crosses on a Hill = cut at 1.5" from Cricut New Testament cartridge; [Sermon].

OWH VCMP - Bee's Knees

The ninth challenge for the OWH VCMP is to create a card with a bee.

Cricut Cartridge:  Paisley
Designer Paper:  My Mind's Eye "Oxford Lane" 6" x 6" pack
Embossing:  Cuttlebug "Honeycomb" folder.
Sentiment:  Scrappy Mom's "Amusing Animals" stamp set.
Ribbon:  from Michaels
Sketch:  OWH Sketch #40

A2 sized card = 5.5" x 4.25"
Cricut Paisley cartridge
Card Recipe:
  • Mat 1 (black) = 5 3/8" x 4 1/8".
  • Mat 2 (flower pattern) = 5 1/4" x 1 3/4". Embossed with Cuttlebug "Honeycomb" folder.
  • Mat 3 (blue pattern) = 5 1/4" x 2 1/4".  Embossed with Cuttlebug "Honeycomb" folder.
  • * Mats 2 and 3 were attached together on a white card stock and then embossed.
  • Mat 4 (black in center) = 2 7/8" x 2 7/8".
  • Mat 5 (yellow pattern) = 2 3/4" x 2 3/4".
  • Ribbon = from Michaels.

  • Bee = cut at 2" from Cricut Paisley cartridge; [Bee] found on page 25 of the folder.  The initial image was cut 3 times to give the bee a chipboard effect before attaching to the card.
  • Sentiment "You're the Bee's Knees" = from Scrappy Mom's "Amusing Animals" stamp set.

Inside of Card
Inside of Card:
  • Mat 1 (black) = 5" x 3.75".
  • Mat 2 (beige) = 4.75" x 3.5".
  • Bee = cut at 1 3/4" from Cricut Paisley cartridge; [Bee] found on page 25 of the folder. 

OWH VCMP - Fall Card with Leaves

The eighth OWH VCMP challenge is to create a fall themed card using leaves.

Cricut Cartridge:  Simply Charmed
Designer Paper:  My Mind's Eye "Reunion" 6" x 6" pack.
Stamped Face:  Peachy Keen "PK-490 Everyday Character Face Assortment" set.
Sentiment:  CardzTV "Encouraging Thoughts" stamp set.
Punch:  Maury punch
Sketch:  OWH Sketch #26


A2 sized card = 5.5" x 4.25"
Cricut Simply Charmed cartridge
Card Recipe:
  • Mat 1 (black) = 5 3/8" x 4 1/8".
  • Mat 2 (red-ish pattern) = 5" x 3 3/4".
  • Mat 3 (black border) = 5 1/2" x 1 7/8".
  • Mat 4 (green-ish pattern border) = 5 1/2" x 1 3/4".
  • Mat 5 (black center) = 3 5/8" x 2 7/8".
  • Mat 6 (orange-ish pattern) = 3 1/2" x 2 3/4".

  • Pumpkin = cut at 2" from Cricut Simply Charmed cartridge: [Pumpkin-s] found on page 60 of the folder.  Face on pumpkin is Peachy Keen stamp "PK-490 Everyday Character Face Assortment."  White gel pen used to color in eyes.  Pumpkin is attached with foam tape.
  • Sentiment "BIG hugs!" = from CardzTV "Encouraging Thoughts" stamp set.
  • Leaves = from Maury punch.

View of Card Inside
Inside of Card:
  • Mat 1 (black) = 5 1/8" x 3 7/8".
  • Mat 2 (green-ish pattern) = 5" x 3 3/4".
  • Mat 3 (beige) = 4 3/4" x 3 1/2".
  • Leaves = from Maury punch.


Cards in Envy Challenge - Manly Cards

Welcome to another Cards in Envy Challenge!  For this challenge we are to create an A2 sized card (5.5" x 4.25") suitable for a man and is definitely masculine.  Only requirement is that the card is 1/4" or less in thickness in order to fit in an envelope.

Masculine cards are always a bit of a challenge for me.  I usually go with blues, greens or browns, so the color of my card below is no surprise!

Designer Paper = My Mind's Eye "Indie Chic"; 6" x 6" pack.
Cricut cartridge = Heritage.
Sentiment = CardzTV "Encouraging Thoughts" stamp set.
Punches = Martha Stewart (fence); Fiskars (clouds)
Other = Tim Holtz Tea Dye Distress Ink.


A2 sized card = 5 1/2" x 4 1/4"
Cricut Heritage Cartridge
Card Recipe:
  • Mat 1 (solid blue) = 5 3/8" x 4 1/8".
  • Mat 2 (brown pattern) = 5 1/4" x 4".
  • Mat 3 (solid blue) = 4 3/4" x 3 1/2".
  • Mat 4 (brown tweed pattern) = 4 1/2" x 3 1/4".
  • Sentiment "Thinking of you" = CardzTV "Encouraging Thoughts" stamp set.


  • Fence Border = 1 1/4" x 4 1/4" (after punched) from Martha Stewart punch.
  • Clouds = from Fiskars punch.
  • Horse and Buggy = cut image and shadow at 2" from Cricut Heritage cartridge; [Buggy] found on page 50 of the folder.  White gel pen used for stitching.  Center of wheels are from Imaginanisce.

Inside of Card
Inside of Card:
  • Mat 1 (blue pattern) = 5 1/4" x 4".
  • Mat 2 (solid blue) = 4 7/8" x 3 5/8".
  • Mat 3 (beige) = 4 3/4" x 3 1/2".
  • Lamppost = cut at 2 1/2" from Cricut Heritage cartridge; [Lamp2] found on page 42 of the folder.

Sunday, September 1, 2013

OWH VCMP - Cards 4 Kids

The 7th OWH VCMP challenge is to make a kiddie card using the following tic-tac-toe board:

I chose to go from bottom left diagonally up to the upper right:  Embossing, Punny Sentiments, Using Punches or Dies.

Cricut Cartridge:  Boys Will Be Boys
Designer Paper:  Recollections
Sentiment:  Scrappy Mom's "Amusing Animals" stamp set.
Punch:  EK Success Scalloped Scallop.
Embossing:  Cuttlebug "Mesh" folder.

A2 sized card = 5.5" x 4.25"
Cricut Boys Will Be Boys cartridge
Card Recipe:
  • Mat 1 (black) = 5 3/8" x 4 1/8".
  • Mat 2 (blue / white polka dots) = 5 1/4" x 4".
  • Mat 3 (white border) = 4" x 1" (final size after punching).  Top punched with EK Success Scalloped Scallop punch.
  • Sentiment "Fishing you a great day" = from Scrappy Mom's "Amusing Animals" stamp set.

  • Fish and Fishing Pole and Round Mats:  cut images and shadow at 2 1/4" from Cricut Boys Will Be Boys cartridge; [Fishing] found on page 71 of the folder.  Fish has been embossed with Cuttlebug "Mesh" folder.  White gel pen used for faux stitching.  Fish is mounted with foam tape.

Inside of Card
Inside of Card:
  • Mat 1 (black) = 5" x 3.75".
  • Mat 2 (blue / white polka dots) = 4.75" x 3.5".
  • Mat 3 (white) = 4.5" x 3.25".